Installing a new shed on your property is an exciting step whether it’s for extra storage, a hobby space, a home office, or a cozy backyard retreat. But before your dream shed arrives, there’s one crucial step you can’t skip: proper site preparation.
Getting your site ready is essential to ensure the stability, longevity, and functionality of your new structure. It also protects your investment and helps avoid costly issues down the road.
At Shed Dealer Services USA, we make it easy for customers to choose and customize the perfect shed with our seamless online experience. But to get the most out of your new building, preparing your property properly is just as important as picking the right style. In this guide, we’ll walk you through everything you need to know to get your site shed-ready.
Why Proper Site Prep Matters
Many shed owners overlook site preparation until the last minute, but it plays a major role in the success of your shed project. Here’s why it’s essential:
Prevents Structural Damage: A well-prepared foundation keeps your shed level, which reduces stress on the structure and prevents warping, sagging, or cracking.
Improves Drainage: Proper grading helps divert water away from the shed base, reducing the risk of rot, mold, and foundation damage.
Ensures Easy Installation: Having a clear, level space makes it easier and faster for the delivery team to install your shed.
Protects Your Warranty: Some manufacturers and dealers may require proper site prep to uphold warranty terms.
Adds Longevity: A stable, dry foundation helps your shed last for years without costly repairs.
In short, good site preparation helps you enjoy your shed without problems or surprises.
Step 1: Choose the Right Location
The first step is picking the best spot on your property. Here are a few things to consider:
Accessibility
Ensure the location is accessible for delivery and installation. Our team needs enough room to maneuver the shed into place. Avoid tight corners, overhanging branches, or uneven terrain that might block delivery.
Drainage
Pick a spot that drains well after heavy rain. Avoid low-lying areas where water tends to pool. If you’re unsure, observe your yard after a storm to see where water collects.
Sunlight and Shade
Depending on how you plan to use your shed, consider sun exposure. Full sun is great for garden sheds or workshops, while partial shade can help regulate temperature in storage sheds.
Local Building Codes
Check with your local zoning office about regulations. Some areas may require permits or have setback requirements, which specify how close a shed can be to property lines or other structures.
Future Plans
Think ahead. Will you want to expand later? Install a driveway or fence? Place your shed where it won’t get in the way of future projects.
Step 2: Clear and Mark the Area
Once you’ve picked the perfect spot, it’s time to clear the area.
Remove Obstacles
Clear out grass, weeds, roots, and any debris.
Trim back any trees or shrubs that may grow into the shed over time.
Remove rocks, stumps, or any buried materials.
Mark the Corners
Use stakes and string to outline the shed footprint. This helps you visualize placement and gives you a guide for leveling and foundation work.
Make sure the dimensions match the shed you’ve chosen using our 3D Shed Builder Tool, which lets you customize the exact size and layout before finalizing your order.
Step 3: Level the Ground
Level ground is critical for a solid shed foundation. If the area is uneven, use a shovel and rake to level it out. For larger jobs, you may need a skid steer or small excavator.
Check level with a long 2×4 and a carpenter’s level
Measure corner to corner diagonally to ensure your space is square
Compact the soil after leveling to reduce settling
Step 4: Choose Your Foundation Type
Your foundation should match the size and purpose of your shed. Here are the most common types we recommend:
Gravel Pad
Best for most standard storage sheds
Offers excellent drainage
Requires a wooden frame (called a box) to contain the gravel
Needs to be level and compacted
At least one foot larger than the shed on all sides
Concrete Slab
Ideal for heavy-duty or permanent sheds
Adds stability and durability
More expensive and requires curing time
May need a building permit
Concrete Blocks or Piers
Quick and cost-effective
Best for smaller sheds
Must be placed precisely to support the structure evenly
Not recommended for wet or unstable soil
If you’re unsure which option is best, our team at Shed Dealer Services USA is here to help you make the right choice based on your needs, location, and budget.
Step 5: Consider Ground Barriers and Drainage
Water is one of the biggest enemies of any shed. Protect your structure with the following tips:
Install a weed barrier or landscape fabric under gravel to prevent vegetation growth
Grade the surrounding area to slope slightly away from the shed
Add a French drain if the area tends to get soggy
Avoid placing your shed at the base of a hill or in a flood-prone area
Taking time to think about drainage during site prep can save you years of headaches.
Step 6: Prepare for Utilities (If Needed)
Planning to use your shed as an office, workshop, or studio? You may need electricity, water, or even internet access.
Before installation, talk to licensed contractors about trenching and running lines to your shed. It’s always easier to handle this before the shed is delivered and installed.
Make sure all utility work is up to code and done safely.
Step 7: Schedule Your Delivery
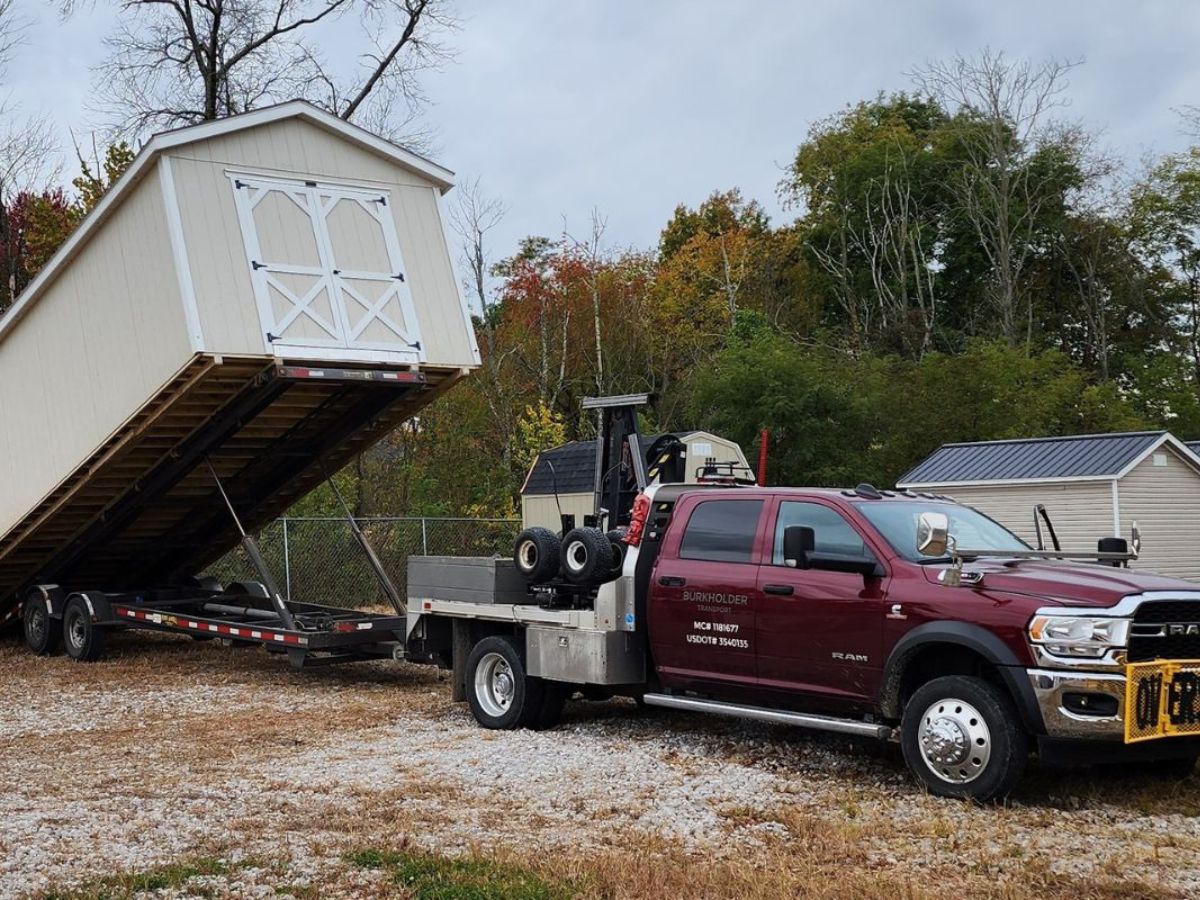
Once your site is ready and you’ve chosen your shed, it’s time to schedule delivery. At Shed Dealer Services USA, we pride ourselves on smooth, stress-free delivery and setup.
Here’s how to make delivery day go smoothly:
Double-check that the site is ready and clear of debris
Make sure the path is accessible for our team
Coordinate any gate or fence openings needed for access
Be present during delivery if possible, or make arrangements with our team in advance
Why Work With Shed Dealer Services USA?
Site prep may sound like a big job, but we’re here to make the process simple and rewarding. Our team offers support every step of the way, from design to delivery. When you work with us, you benefit from:
Easy online design with our 3D Shed Builder Tool
Multiple shed styles to suit your property and needs
Transparent pricing and flexible financing options
Reliable delivery and setup services
A customer-first experience with real people ready to help
We’ve helped homeowners and businesses across the country bring their shed ideas to life. Whether you’re adding a backyard workshop, a playhouse, or just need more storage, we make the journey easy and enjoyable.
Ready to Get Started?

Designing and installing a shed should be an exciting process—not a stressful one. And with the right site preparation, your shed will serve you well for years to come.
Use our 3D Shed Builder Tool to customize your shed online. It’s fast, fun, and gives you a clear picture of what your finished project will look like.
Have questions or want help with your order? Contact us today and let our friendly team guide you through the process from start to finish.